ArgoBot Drive Training
Here you'll find some tutorials to write drive code for the ArgoBot (or any robot) using LabVIEW or C++
This project is maintained by FRC1756-Argos
Tutorial 7: Debounce
Up until this point, all our controls have been time-independent. A joystick input will generate the same output no matter what has happened in the past.
Sometimes, we need to use time and history to determine control behavior. One of the simplest forms of this is digital debounce
What is “debounce”
Digital inputs have two values: 0 or 1 (sometimes referred to as “Low” and “High”). In an ideal world, an input would always neatly fit into one of these categories, but that’s not always the case.
Consider the following:

We expect an input (say, a button) to go cleanly from 0 to 1 when we press it. Instead, the value may fluctuate between 0 and 1 for some period before staying at 1. If we want to perform an event when the button is first pressed, this “bounce” would cause our event to happen more often than we want it to.
The solution to this is to add “debounce” logic to eliminate the digital “bounce”.
Control Design
To remove the bounce, we want to only change the value of a digital value if it maintains the new value for a number of consecutive cycles. This will involve some new blocks to compare old and new values
Implement the Design
- Start by making a new VI named
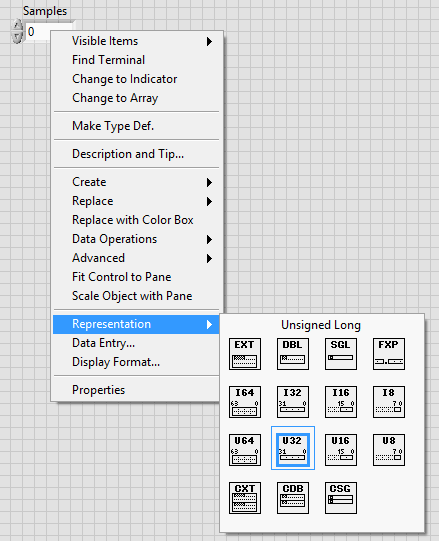
Debounce.viwith one boolean input, one integer input, and one boolean output - Because the default numeric control is floating point value (can contain decimal numbers) and we want an integer value, we’ll need to change the representation of the new control. Do this by right clicking on the control an selecting “Representation”>”Unsigned Long”
- Any of the “I” values in the representation menu are signed integers, any of the “U” values are unsigned integers (positive values only), the top row has floating point values, and the bottom row has complex numbers
- The “32” or other numbers on the icons indicate the number of bits that represent the number inside the computer. Larger numbers indicate the control can handle larger values. U32 or I32 is big enough for most applications since it can hold values up to 4 billion or 2 billion, respectively

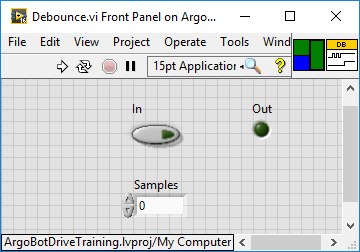
- At this point, you should have a front panel like the following:

- Switch to the block diagram
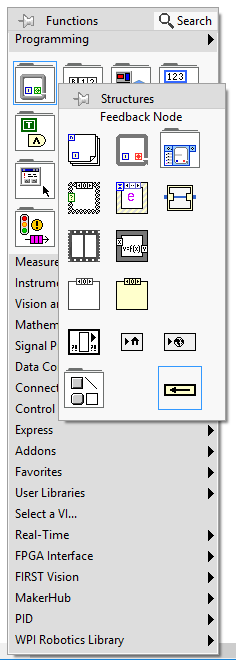
- The new block we’re going to use is the “Feedback Node”. The feedback node “remembers” the previous value put into it and returns that value on the next execution
- When wiring the feedback node, the current value goes into the back of the arrow, and the previous value comes out the arrow head side

- When wiring the feedback node, the current value goes into the back of the arrow, and the previous value comes out the arrow head side
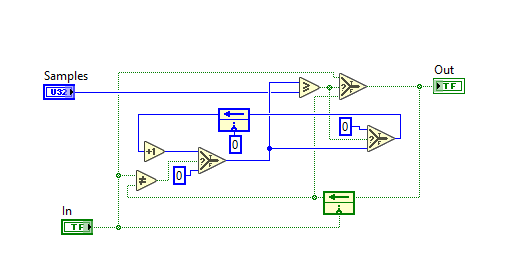
- Now, we want to implement the following pseudocode
variables: Samples, SampleCount, In, PrevOut, Out

if firstRun:
    PrevOut = In
    SampleCount = 0

if In != PrevOut:
    SampleCount = SampleCount + 1
else:
    SampleCount = 0 // Zero consecutive new value samples

if SampleCount > Samples:
    Out = In
    SampleCount = 0 // Reset sample count on output change

PrevOut = Out

Loop
- If you have an idea how to do this, go ahead and try it now before viewing the solution.
- I’m serious, it may seem complicated, but you’ve done all the building blocks in previous exercises
- Need some hints?
- The
if firstRunblock is known as ‘initialization’ and is necessary to set the values of the feedback nodes at the beginning. The input at the bottom of the feedback node is for initialization - The
SampleCountandPrevOutvariables in the pseudocode correspond to two feedback nodes in the solution - The
ifstatements can be represented by select blocks in your LabVIEW code - There’s a block called ‘Increment’ in the numeric palette that you can use for the
SampleCount = SampleCount + 1statement
- The
- OK. Now that you’ve come up with a solution on your own, see how it compares to this solution:

- Save your VI
Great! Now that you’re getting more comfortable in LabVIEW, you should be able to translate concepts into code more easily. Don’t worry if you had to look at the solution, but if you try it on your own first the solution may help you learn more. Now let’s use your new code
Integrate Your Code
- Open
Drive_Button.viand go to the block diagram - Add your debounce block to one of the button inputs
- Add a control for the ‘Sample’ input
- Insert
Drive_Button.viintoArgoBot_Main.vi - Run your code
- Try driving with the sample count set low (e.g. 0-5)
- Try driving with a high sample count (e.g. >20)
- Try tapping the button you added debounce to and see how it responds with different sample counts
What did you notice when using the debounced output? Was there a noticeable difference between low and high sample counts?
Congratulations! You’ve completed your first control component with history! Next, we’ll be implementing another component with history, speed ramping!
| <-Previous | Index | Next-> |